I’ve watched the swoop braided ponytail take over social media, and honestly, I understand why. This style combines elegance with edge, giving you that polished look while protecting your hair. Whether you’re heading to work or a special event, this versatile style works beautifully.
Over the years, I’ve mastered everything from the sleek braided ponytail with swoop to more intricate variations. The beauty of braids swoop ponytail styles is their adaptability. You can rock ponytail cornrow braids with swoop for a bold statement, try swoop braids into ponytail with cascading curls for romance, or opt for feed in braids ponytail with swoop for a seamless finish.
I’m sharing 12 stunning variations that will inspire your next look.
Classic Sleek Braided Ponytail with Swoop

What Makes This Style Special
The classic sleek braided ponytail with swoop brings together elegance and a touch of retro charm. I fell in love with this style because it frames your face beautifully while keeping everything polished and sophisticated. The swooping section creates that eye-catching effect that draws attention to your facial features, particularly flattering for oval, heart-shaped, or square face shapes.
What sets this style apart is its versatility. I can wear it to formal events or casual outings, and it always feels appropriate. The 1990s nostalgia it brings adds personality without feeling dated. Best of all, when I have my products ready, I can pull this look together in under five minutes.
Best Hair Type for This Look
This style works across different hair textures, though each requires slight modifications. For 4A hair, I start with damp, moisturized strands since this texture detangles easily and retains moisture well. With 4B hair, which experiences 50-75% shrinkage, I always blow dry first to stretch the hair and apply heat protectant plus oils to prevent breakage. For 4C hair, I use hair oils and butter to prep and seal before styling since this texture holds styles longer but needs extra moisture to avoid breakage.
Step-by-Step Tutorial
- Straighten your hair: Apply heat protectant and use your straightener on appropriate settings for your texture. Lower heat preserves your hair’s integrity.
- Part and section: Use a rat-tail comb to create your desired part. Separate the bang section that will swoop across your forehead.
- Smooth the sections: Divide hair into three sections (side, back, side) and apply edge control or gel to each. Sub-sectioning helps the style last longer and prevents excessive tension[42].
- Create the ponytail: Secure the back section first, then pull each side back with a polishing brush and attach to the base ponytail.
- Perfect the swoop: Use a small toothbrush or soft bristle brush to blend edges seamlessly, then smooth your swooping section across your forehead.
- Lock it in: Apply hairspray generously and use low heat from your blow dryer to freeze the style in place.
Products You’ll Need
A boar bristle brush creates that super smooth finish with minimal frizz[41]. Quality hair gel provides hold without flaking throughout the day. I reach for edge control specifically designed for my texture. Heat protectant is non-negotiable for straightening. Small invisible elastics work best for securing, and hairspray locks everything down. A flyaway wand has become my secret weapon for taming baby hairs.
Pro Tips from My Experience
Sub-sectioning makes all the difference in how long your style holds. I learned this after too many ponytails fell flat by midday. Adjust your heat settings based on whether your hair is fine, medium, or coarse. To maintain the look, wrap a silk or satin scarf around the base when sleeping. This ponytail typically lasts 7-10 days before your hair needs to breathe.
Feed In Braids Ponytail with Swoop

What Makes This Style Special
Feed-in braids ponytail with swoop changed how I approach protective styling. Unlike starting with a full chunk of extension hair, this technique gradually adds synthetic hair as you braid, creating a seamless transition from your natural hairline. The result feels lighter on your scalp while looking polished and natural.
This style gives you that perfect mix of “I tried” and “I woke up like this” energy. The clean scalp look stays sporty yet cute, and the braids keep everything secure during long days. What I appreciate most is how the feed-in method reduces tension compared to traditional knotted braids, though it may not work well if you have a sensitive scalp since the braids need to be somewhat tight.
Best Hair Type for This Look
This style works across multiple textures, but preparation matters. Hair performs best when detangled and slightly stretched through blow-drying on low tension, banding, or thorough combing. If your hair feels super slippery, add a small amount of product for hold before starting.
Step-by-Step Tutorial
Lightly mist your first section with water, then apply gel or wax near the roots. Brush through with an edge brush for controlled texture without crunchiness. Create your part and section hair into two or four parts depending on your desired braid count.
Start right at the hairline with a small triangle section, split into three strands, and complete 1-2 stitches before adding hair to anchor the braid. As you continue braiding, gradually feed in small pieces of synthetic hair rather than starting with a large chunk. Angle each braid toward your chosen ponytail position, creating arrows that point to the same destination.
Gather all loose hair and braid ends into your ponytail position, smooth with a brush, and secure with a strong hair tie wrapped two to three times. For lift, slide bobby pins vertically through the hair tie into the base on both sides. Wrap a small hair section around the elastic and pin underneath for a professional finish.
Products You’ll Need
Most feed-in styles use kanekalon synthetic hair since it looks and feels natural after blow drying without excessive shine. Choose pre-stretched hair to prevent unraveling at the ends. You’ll need edge control, a strong brush, hair ties, bobby pins, and light oil or serum for shine without grease.
Pro Tips from My Experience
Feed-in braids typically last about two weeks before hair growth loosens the braids and diminishes that sleek appearance. Pricing varies widely based on design intricacy and location. In NYC, expect to pay anywhere from USD 65 to upward of USD 200. Wrap your ponytail with a bonnet at night to prevent premature frizzing and maintain freshness longer.
High Swoop Ponytail with Knotless Braids

What Makes This Style Special
Knotless braids transformed my relationship with protective styling. After years of dealing with the tension headaches that came from traditional box braids, discovering the knotless method felt like freedom. This technique skips the heavy anchor knot at the root, which significantly reduces tension on your hair follicles. When styled into a high ponytail with a swoop, the result is both striking and comfortable.
What I love most is how this braids swoop ponytail feels immediately after styling. The side swoop becomes much more flexible and comfortable to wear right away, unlike traditional braids that need a few days to “settle in.” The flat, natural-looking finish blends seamlessly with your own hair, creating that effortless appearance I always aim for with my clients. When gathered into a high ponytail, these braids lay beautifully and offer a lightweight feel that you’ll notice all day long.
For anyone with a sensitive scalp, this style is highly recommended. I’ve worked with countless clients who couldn’t tolerate regular braids but found knotless comfortable enough to wear for weeks. Besides the comfort factor, the modern esthetic gives you that clean, understated look that works everywhere from the office to evening events.
Best Hair Type for This Look
This style adapts to various textures. I’ve successfully created this look on everything from fine 4A curls to dense 4C coils. The key is proper preparation. Your hair should be detangled and slightly moisturized before braiding begins. The lack of knots makes the braids lighter and easier to carry, which benefits all hair types equally.
Step-by-Step Tutorial
Part your hair to create the swoop section at your hairline. I typically carve a deep side part and French-braid a small crown or side section to form that signature swoop shape. Starting at your natural hairline, begin your first knotless braid without adding a bulky knot. As you braid downward, gradually introduce small amounts of braiding hair for length and volume.
Continue this process across your entire head, angling each braid upward toward where your ponytail will sit. Once all braids are complete, gather them at your crown and secure with a strong elastic. The high placement creates drama while the swoop softens the overall look.
Products You’ll Need
You’ll need quality braiding hair, edge control for the swoop section, a rat-tail comb for parting, strong hair elastics, and a light oil for shine.
Pro Tips from My Experience
Try various ponytail heights to find what matches your facial shape best. I find mid-height works for round faces while sky-high placements elongate square faces. Sleep with a satin bonnet to preserve the swoop’s smoothness between styling sessions.
Side Swoop Low Braided Ponytail

What Makes This Style Special
One of my favorite moments from styling bridal parties was creating this exact look for a bride who wanted elegance without stiffness. The low braided ponytail with swoop offers a more relaxed and romantic vibe compared to its high-top counterparts. While high ponytails make bold statements, this variation sits at the nape of the neck, making it comfortable for long-term wear.
I’ve seen this style on red carpets because it looks polished and professional while still feeling modern. The braids curve gently across the forehead to create that signature swoop before gathering into a soft ponytail. What makes it special is how it works for almost every occasion, from casual outings to formal events. The swoop element frames your face beautifully while keeping hair neatly secured.
Best Hair Type for This Look
For natural hair, this style celebrates your texture while maintaining a polished finish. I always start with thorough detangling followed by generous edge control application to achieve that smooth swoop across the forehead. Many of my clients with natural hair prefer to blow dry or lightly stretch their hair first, which makes the braiding process easier and the final look sleeker. You can leave the ponytail in its natural puff state or twist it into a protective bun.
Step-by-Step Tutorial
Start on the front side of your head and begin French braiding along the side, pulling more hair into sections with each braid. Continue braiding until you reach the nape of your neck, adding hair as you go and pulling tight. As you reach the nape, move the braid toward the side rather than straight down. When you reach the back, braid straight down with just the sections gathered so far and secure with a hair tie.
Gather the rest of your hair into a low ponytail on the opposite side of your head. Pull the braid over to this section and secure them together with another hair tie. Remove the bottom tie on the braid so only the section moving around your head remains braided. Take a small section of hair and wrap it around the hair tie to disguise it.
Products You’ll Need
Strong-hold edge control or styling gel keeps flyaways down and maintains that glass-like shine. A boar bristle brush creates the super smooth finish. You’ll need hairspray to lock the style in place and oil on the ends to minimize split ends. Flyaway wands have become essential for smoothing edges.
Pro Tips from My Experience
This style serves as a great protective option that keeps your ends tucked away. I recommend sleeping with a silk scarf wrapped around the base to maintain freshness between styling sessions.
Double Swoop Braided Pigtail Ponytails

What Makes This Style Special
Pigtail braids came roaring back, and I couldn’t be happier about it. This double swoop braided pigtail ponytails style captures that perfect childhood throwback feel while looking completely put together. What I find remarkable is how this look fits neatly into several major trends happening right now, including coquette, Y2K, French-girl beauty, prep, and sporty esthetics.
The double swoops frame your face symmetrically, creating balance that works beautifully for photography. This style makes a great vessel for hair accessories, so I often add ribbons or decorative elastics for clients attending special events. When done correctly, these braids manage to level up every single outfit, adding a fashion-forward feel to even basic jeans and a T-shirt.
Best Hair Type for This Look
This style adapts across textures, though results vary based on hair thickness. I’ve noticed the volume technique works significantly better for thick hair. With thinner hair, you might see where the two pigtails split underneath the ponytail, though fluffing helps cover this. Day-two hair actually serves this look better than freshly washed strands since slightly greasy roots provide more grip and lift.
Step-by-Step Tutorial
Weave two hair ties together to create a double loop. Separate your hair into pigtails at your desired height. Tie one pigtail with one loop, leaving the other loop exposed. Make the second pigtail and tie it into the remaining loop. Reach between the two pigtails and pull both together as one, then flip them over. This creates lift since the ponytail rests on top of the two elastics.
Products You’ll Need
Strong elastics are essential. Texturizing spray adds grit and lift, particularly helpful for fine hair. A smoothing brush and edge control perfect your swoops.
Pro Tips from My Experience
Adding texturizing spray before styling gives you that coveted volume and hold. The symmetry of double swoops requires patience, so take your time matching each side.
Swoop Ponytail with Rope Braid

What Makes This Style Special
Rope braids surprised me when I first learned them at the academy. I expected complexity, but the two-strand technique turned out simpler than traditional three-strand braids. What makes this swoop braided ponytail variation special is how it elevates your classic ponytail into something party-worthy or formal-event-ready.
The rope twist adds texture and visual interest without requiring advanced braiding skills. I love how versatile rope braids are; they look plain or intricate depending on how you style them, and work beautifully worn down or in updos. For clients with bangs, this style keeps face-framing pieces secured no matter how active the day gets.
Best Hair Type for This Look
Rope braids work across all hair types and textures. I’ve created this look on straight, wavy, and curly hair with equal success. Second-day hair actually performs better since natural oils provide grip. If your hair feels too slippery, add a small amount of gel for hold.
Step-by-Step Tutorial
Comb your hair back and take two front sections. Twist both pieces in the same direction toward your face. Cross the sections over each other in the opposite direction from your twist. Secure with a clear elastic, then tie remaining hair into a low ponytail. Leave one thin section from the side and wrap it around the ponytail base to hide the elastic.
Products You’ll Need
Quality gel prevents flaking while delivering hold and shine. A boar bristle brush creates smoothness with minimal frizz. Nourishing oil calms frizz and adds glossy finish to braid ends. Small invisible elastics and hairspray lock everything in place.
Pro Tips from My Experience
Twist each section before crossing to keep the rope braid tight and prevent loosening. Pancake your finished braid by gently pulling edges for added volume.
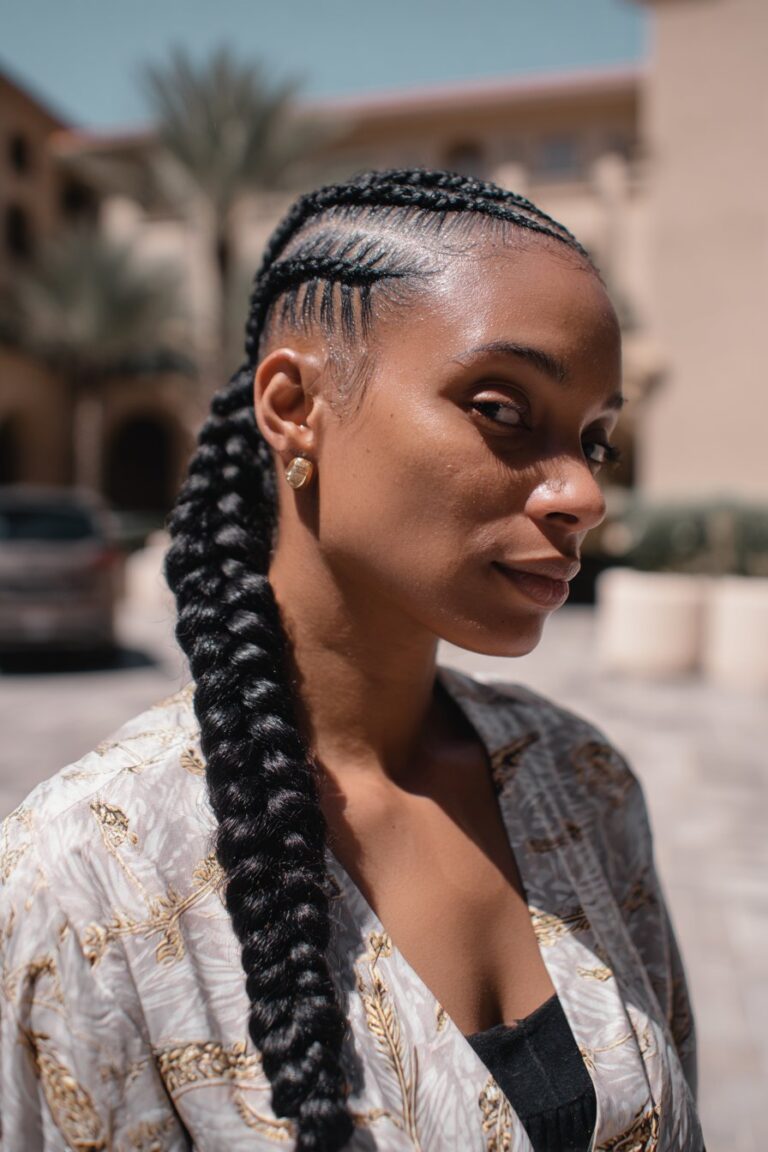
Sleek Swoop with Cornrow Braids Ponytail

What Makes This Style Special
Cornrows hold a special place in my styling arsenal. Choosing this sleek braided ponytail with swoop offers a traditional yet edgy vibe that delivers incredible durability. The neat, structured foundation ensures every strand stays in place for days at a time. What excites me most is the creative freedom with parting patterns. I’ve designed straight lines, zig-zags, and curved designs that lead beautifully into the main ponytail. This swoop elevates the classic ponytail by adding artistic flair, capturing movement and sophistication as it gracefully frames the face.
Best Hair Type for This Look
This style works across textures when prepared correctly. I always start with clean, straightened hair for the smoothest results. Heat protectant comes first, followed by straightening appropriate to your texture.
Step-by-Step Tutorial
Spray heat protectant and straighten your hair thoroughly. Apply strong-hold gel or edge control from roots to where your ponytail begins. Create your desired parting pattern, then cornrow each section angling toward your ponytail position. Gather all braids and secure with a quality elastic. Blow dry on low setting to set the style. Wrap a small section around the elastic for a polished finish.
Products You’ll Need
Strong-hold braiding gel prevents flaking while delivering definition. High-shine oil sheen makes cornrows pop and keeps your scalp hydrated. I recommend edge control that lasts 24 hours without white residue. Boar bristle brushes create that glass-like smoothness. African Pride Braid Sheen Spray adds shine and prevents itching.
Pro Tips from My Experience
This low-maintenance look appears salon-quality without constant touch-ups. Following the initial style, your cornrows stay fresh for extended periods. Sleep with a satin bonnet to prevent premature frizzing.
Swoop Braids into Ponytail with Curls

What Makes This Style Special
Texture mixing became my secret weapon after years of watching clients struggle to choose between sleek sophistication and playful volume. This swoop braids into ponytail with curls delivers both. The structured elegance of braids combines beautifully with the bouncy, free-spirited nature of curls. You can use your natural curls or attach a curly drawstring ponytail for added drama and length.
The contrast between the flat, sleek braided swoop and the voluminous curls at the back creates visual drama. This hairstyle works for brunch dates or summer outings because it feels light, airy, and effortlessly chic. It truly offers the best of both worlds.
Best Hair Type for This Look
This style celebrates various curl patterns. Whether you’re working with 3B spirals or 4C coils, the braided swoop ponytail adapts beautifully. Natural curls work perfectly, though extensions add length for shorter hair.
Step-by-Step Tutorial
Part your hair and apply edge control along your hairline. Create your swoop by braiding a section from your hairline across your forehead, angling toward your ponytail position. Gather the remaining hair into a ponytail at your desired height. Fluff your curls to maximize volume and create that signature contrast with the sleek swoop.
Products You’ll Need
Moisturizing mousse or curl defining cream keeps the ponytail looking hydrated and frizz-free throughout the day. Edge control and a small brush style baby hairs into decorative swirls and swoops. Laying your edges helps the main swoop look more integrated while adding a soft, feminine frame to your face.
Pro Tips from My Experience
The swoop element adds a touch of glamor that elevates the entire esthetic. Master your baby hair technique for that professional, high-end finish that makes this style truly shine.
Butterfly Braid Swoop Ponytail

What Makes This Style Special
Butterfly braids caught my attention during a bridal photoshoot when the photographer requested something “unique but wearable.” The intricate stitch pattern creates dimension that photographs beautifully from every angle. This stunning butterfly braid add-on transforms a basic ponytail into statement-making artistry. What sets it apart is versatility. You can position butterfly braids on top of your head for drama or create a low swoop ponytail with messy butterfly elements for relaxed elegance.
Best Hair Type for This Look
Natural hair lovers find this style particularly flattering. The butterfly technique works across textures, celebrating black girl hairstyles while offering protective benefits. Middle parts or side parts both complement the butterfly braid structure.
Step-by-Step Tutorial
Create your swoop section along the hairline. Begin your butterfly braid by making small horizontal stitches that fan outward, resembling butterfly wings. Secure at intervals as you work toward your ponytail position. Gather remaining hair into your desired ponytail height.
Products You’ll Need
Edge control, a fine-toothed comb for precision parting, and strong elastics form your foundation.
Pro Tips from My Experience
Practice the butterfly stitch pattern on a mannequin first. The technique requires patience but delivers show-stopping results.
Fishtail Braid Swoop Ponytail

What Makes This Style Special
Fishtail braids became one of my most-requested techniques during my styling workshops. The intricate weaving pattern creates an elegant, boho look that photographs beautifully. What I appreciate most is the versatility, particularly for long layered hair where standard styles typically don’t last all day. The textured appearance adds dimension without requiring advanced braiding knowledge once you master the technique.
Best Hair Type for This Look
This style adapts across textures. Second-day hair performs better since natural oils provide grip and hold. For fine hair, texturizing spray adds necessary grit and volume. I recommend using a smoothing serum on thicker or textured hair to tame frizz and flyaways.
Best Hair Type for This Look
Comb hair thoroughly, then create a high ponytail and secure with an elastic. Divide the tail in two sections. Take a small strand from underneath one side, bring it over, and include it within the other side. Repeat on the opposite side, continuing this method down your hair. Secure the end with a clear elastic. Gently pull at the strands to make the braid fuller and create an effortless appearance.
Products You’ll Need
Redken’s One United Multi-Benefit Leave-In Conditioner detangles and improves manageability. Redken Dry Texture Spray reintroduces grit for better hold. Flexible hairspray locks your style in place.
Pro Tips from My Experience
Fishtail braids require patience and time commitment. Lightly tug outward on your braid to add movement, but avoid pulling too harshly or it unravels quickly.
Swoop Ponytail for Short Natural Hair

What Makes This Style Special
Short hair doesn’t mean sacrificing the swoop braided ponytail trend. After years of helping clients with shorter lengths achieve this look, I discovered that clip-in extensions unlock endless possibilities. The beauty lies in how seamlessly you can add volume and length while maintaining that signature swoop across your forehead. This style works beautifully for professional settings, special events, or when you simply want to switch up your look without commitment.
Best Hair Type for This Look
This style adapts to all natural hair textures. The key is working with what you have and strategically placing extensions where needed for fullness.
Step-by-Step Tutorial
Start by placing your first clip-in at the bottom, clipping upside down. This technique prevents bulges or bumps underneath when you gather everything into a ponytail. Fill in additional clip-ins where you need more volume. Create a part close to your forehead so you can lay a section across the front for your swoop. Use bobby pins to ensure everything stays slicked down with no stray pieces. For an elegant finish, take a small section of hair from underneath and wrap it around the elastic band, securing with a bobby pin.
Products You’ll Need
Quality clip-in extensions in 18-inch length work well. Edge control, bobby pins, and a strong elastic complete your toolkit.
Pro Tips from My Experience
The upside-down clipping method makes all the difference in achieving a smooth, professional finish without visible bumps.
Drawstring Swoop Braided Ponytail

What Makes This Style Special
Drawstring ponytails revolutionized my approach to quick styling during my busiest weeks in Los Angeles. This method solves the age-old problem of achieving instant length and volume without spending hours in a salon chair. The adjustable drawstring mechanism ensures a secure and comfortable fit for all hair types, making it my go-to recommendation for clients with packed schedules.
What makes this style particularly brilliant is how it pairs protective styling with convenience. You can install it in just minutes, and it requires less maintenance than clip-ins, tape-ins, or microlink extensions. The braided swoop adds that polished touch while the drawstring ponytail delivers drama and fullness. This combination promotes hair growth since it causes no damage to natural hair and bears styling pressure instead of your own strands.
Best Hair Type for This Look
The adjustable design works across all textures, from fine to thick and curly to straight. I’ve successfully styled this on clients with 4A through 4C hair textures. The key is creating a smooth base bun that allows the drawstring to grip securely.
Step-by-Step Tutorial
Brush your natural hair back and wrap it into a mid or high bun, securing with an elastic. Use bobby pins to tuck stray strands. Take the drawstring ponytail and slot the two combs on either side of your bun. Pull the adjustable drawstring snug against the bun, then tuck it underneath the ponytail. Secure with hair pins to keep the drawstring hidden. Create your swoop by laying edges with gel and a small brush. Take one curl from the ponytail and wrap it around the base, pinning it in place for a seamless finish.
Products You’ll Need
A smoothing brush with soft bristles creates an even bun. Firm-hold gel or edge control prevents flyaways. Hair elastics or bungees secure your natural bun, while bobby pins keep everything locked down. Choose a quality drawstring ponytail extension in your preferred texture and length.
Pro Tips from My Experience
Always wash and dry your extension piece before installation. Position your natural bun where you want the ponytail to sit, since that determines final placement. Wrapping a curl around the base hides hardware beautifully and creates that salon-quality finish I always aim for with my clients.
Conclusion
I’ve walked you through 12 stunning swoop braided ponytail variations that work across different textures, occasions, and skill levels. Given that each style offers unique benefits, you now have options for everything from casual outings to formal events. Whether you choose the classic sleek look, feed-in braids, knotless comfort, or playful pigtails, the key is finding what makes you feel confident. Start with one style that speaks to you, practice the technique, and build from there. Remember, hair tells your story. I’m here to help you tell it beautifully, one swoop at a time.